

Halloween Pumpkin Sugar Cookies with Spider Web Design
These easy Halloween pumpkin cookies are soft, chewy pumpkin sugar cookies made with real pumpkin and warm pumpkin pie spice. The dough is scooped rather than rolled and cut, then finished four ways: plain, with cinnamon sugar, with icing and sprinkles, or with a simple spider-web design. The spider webs look impressive, but they’re surprisingly simple to make.
For ease of browsing, you can find all of my Halloween recipes in one place.

Why You’ll Love This Recipe
🎃 Pumpkin sugar cookies — Real pumpkin purée, pumpkin pie spice, and cinnamon give these cookies plenty of fall flavor.
🎃 Soft & chewy — These cookies have a tender, chewy texture that pairs perfectly with the warm spices.
🎃 Simple but impressive — A quick glaze and spider-web design make these cookies look fancy without complicated decorating skills.
Pook’s Pantry participates in affiliate programs. If you make a purchase through one of my links, I may earn a small commission. For more information, please see my disclosure policy.

Pumpkin Sugar Cookies
If you’re looking for a Halloween cookie that doesn’t require a cookie cutter or a lot of decorating, this is it. The cookies are delicious on their own, but the simple decorations give you plenty of options for serving them at Halloween parties, school events, or fall gatherings.
Ingredients
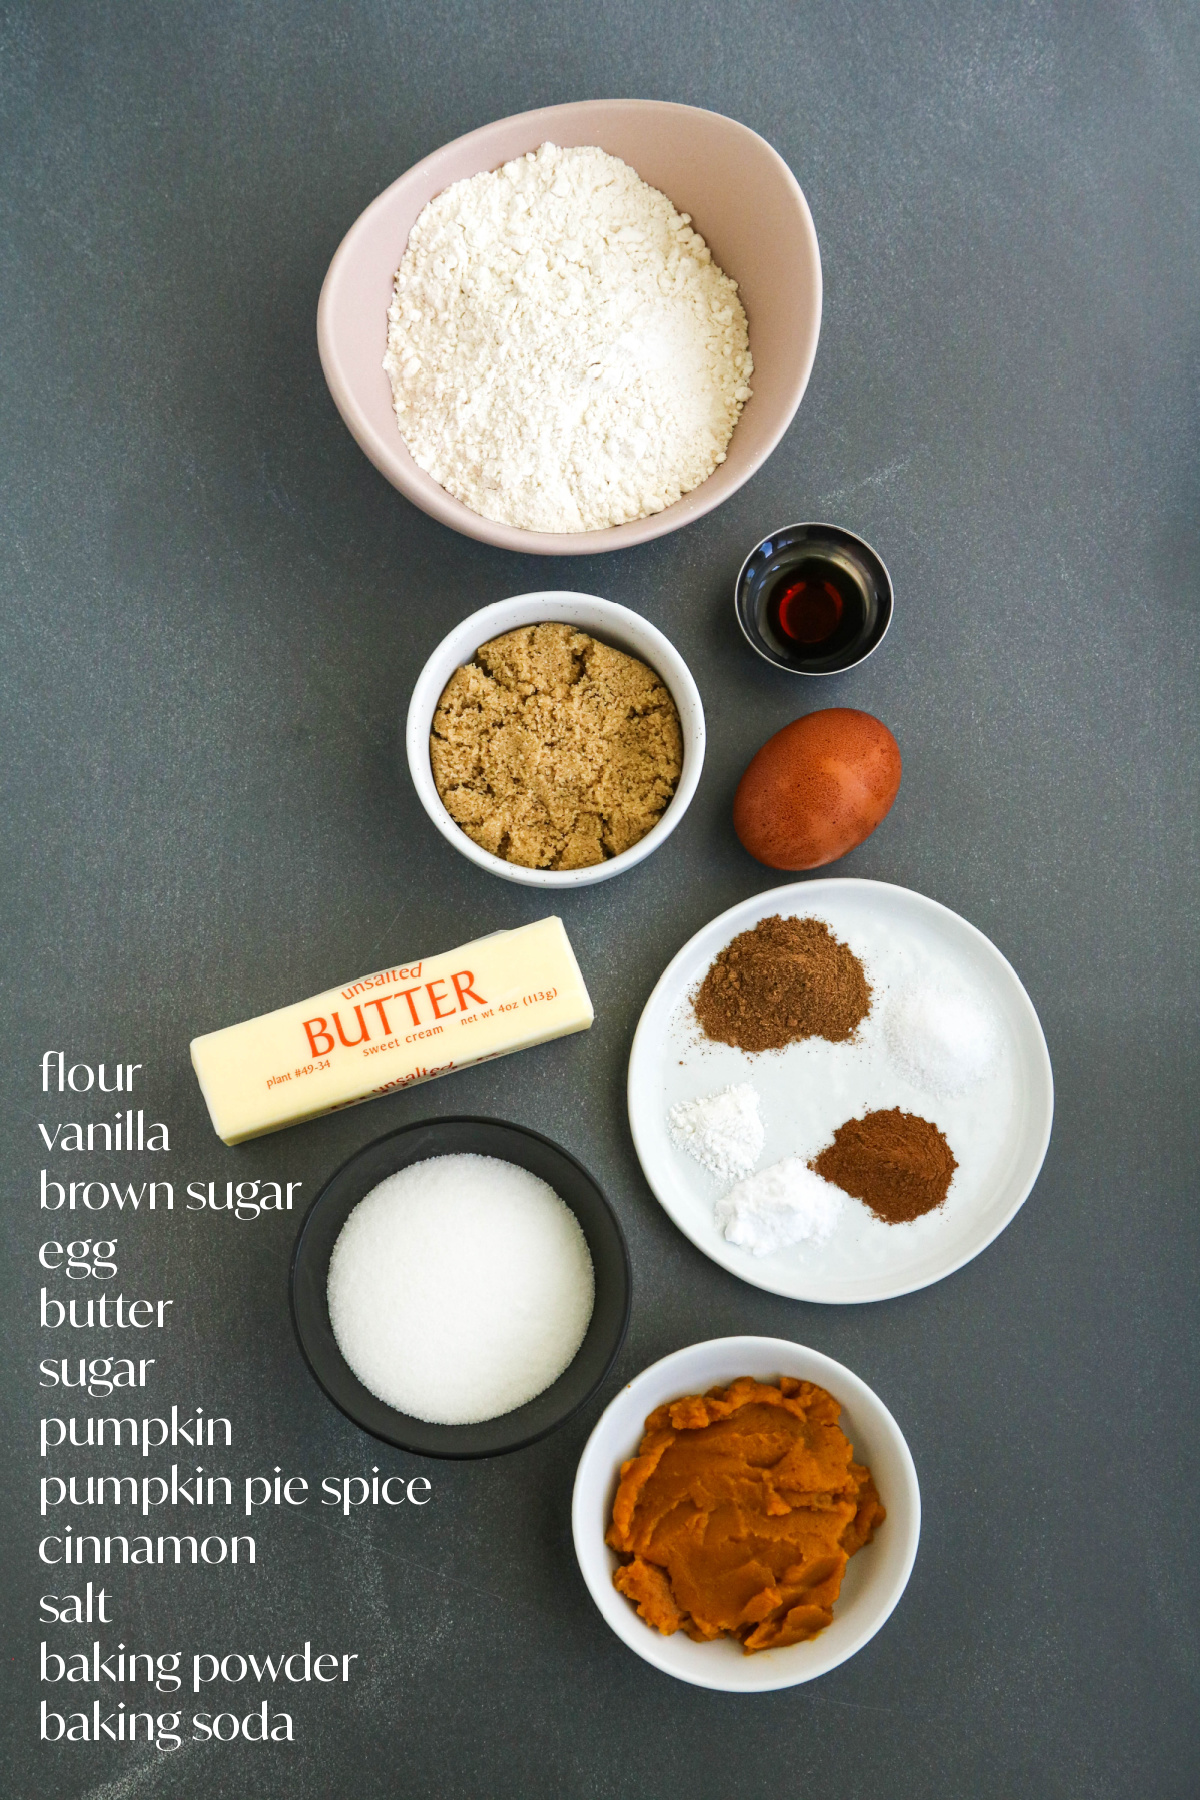
- Flour – The regular all-purpose flour you have in the pantry.
- Vanilla – Pure vanilla extract, gives a warmth and sweetness to the cookies.
- Sugar and brown sugar – Give the cookies just a touch of sweetness, not too much.
- Egg – Eggs provide stability and structure. Large eggs are the standard size in recipes.
- Butter – Unsalted, or “sweet cream” butter.
- Substitution: If you prefer to use salted butter, reduce the added salt to 1/4 teaspoon.
- Pumpkin – 100% pure pumpkin purée in the can. I test with Libby’s brand.
- Pumpkin pie spice + Cinnamon – A blend of warm spices, you can certainly use the individual spices if you like.
- Salt – All baked goods need salt, it helps to balance the sweetness.
- Baking powder and baking soda – Baking powder gives the cookies just a tiny bit of lift, while the baking soda helps the cookies spread just the right amount.

How to make
Here’s a quick summary of how to make Halloween pumpkin cookies. Please see the recipe card at the bottom of this post for the full recipe.
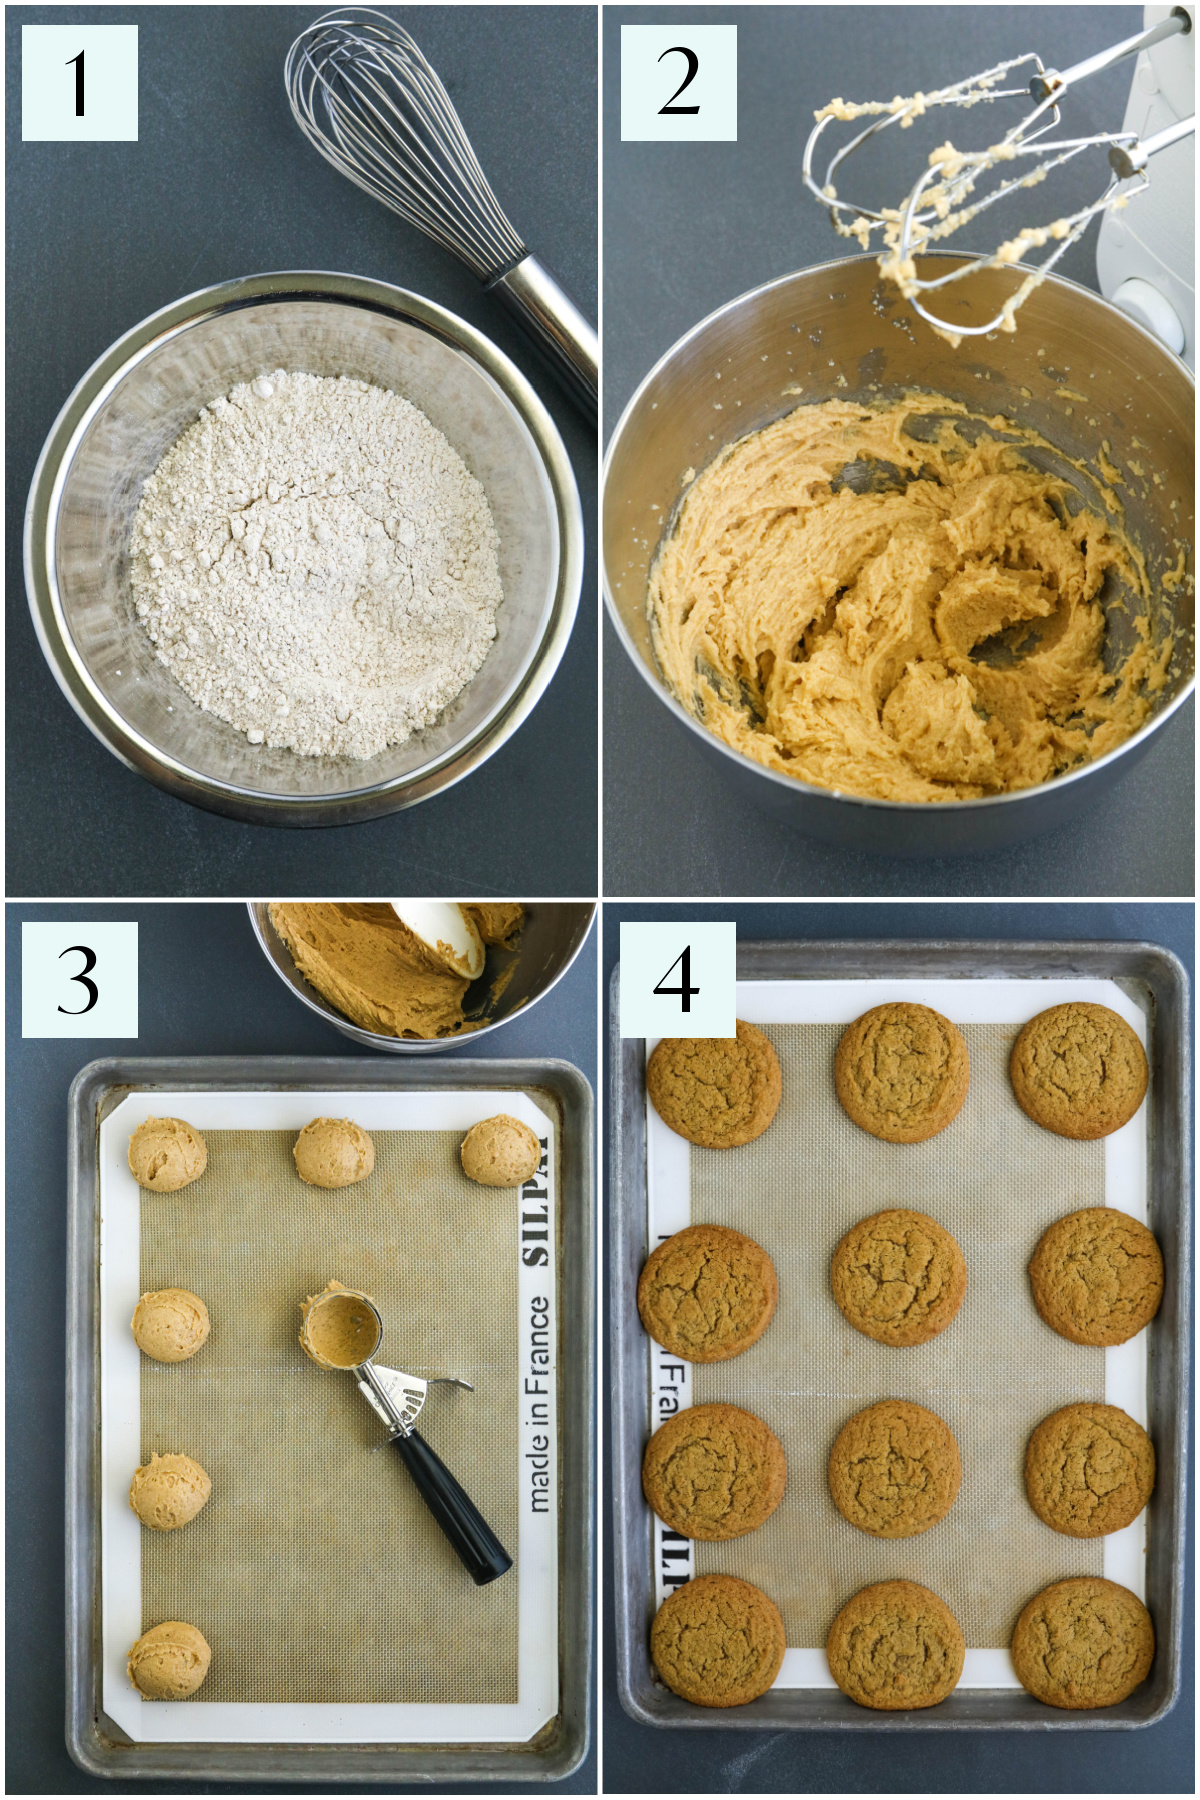
- Whisk all of the dry ingredients together in a mixing bowl.
- In a separate mixing bowl, beat butter and sugar together until fluffy. Then add remaining wet ingredients and mix to combine. Add flour mixture to butter and sugar mixture and mix until uniform.
- Next, use a cookie scoop to portion dough onto prepared baking sheet. Chill the dough, then bake. Visual cue: You want the cookies to be lightly browned and set around the edges.
- Let the cookies cool slightly before moving them to a cooling rack to cool completely.

Easy Ways to Decorate Halloween Pumpkin Cookies
These chewy pumpkin sugar cookies are delicious as is, but if you want to decorate them for Halloween, here are a few tips to help you do just that. Mix all of the ingredients for the cookie glaze (recipe in card below) in a small bowl until smooth. Use a small offset spatula to spread the glaze on the cookie.
- Plain pumpkin sugar cookies — Leave them undecorated, or lightly dust with cinnamon sugar, for a simple, spiced cookie.
- Spider-web cookies — Use the glaze and spider-web technique for a Halloween design that’s eye-catching without requiring elaborate decorating skills.
- Iced pumpkin sugar cookies with sprinkles — Finish the cookies with icing and Halloween sprinkles for a colorful, festive look.

Halloween Pumpkin Sugar Cookies FAQ’s
Yes. Scoop the dough, cover the tray, and refrigerate for up to 24 hours before baking. Bake straight from the fridge, add a minute or two if needed.
Yes, as long as it’s smooth purée. Drain it in a fine mesh strainer or blot it with paper towels first, because fresh pumpkin holds more water than canned and can make the cookies too cakey.
Yes. I shipped the cookies in this photo to my nephew, so I can guarantee you that they travel well. Let the glaze dry completely, then stack them with pieces of parchment paper in between each cookie, in a tin. They are a moist cookie and can stick a little if you live in a warm or humid climate. See my post on how to ship cookies.

Storage / Freezing Information
To store: Keep cookies in an airtight container at room temperature for up to 3 days. For best results, layer them with parchment paper so they don’t stick. Let the glaze dry fully before stacking.
To freeze: Freeze plain, unglazed cookies in a freezer bag or container for up to 3 months. Thaw at room temperature, then glaze and decorate.
To freeze the dough: Scooped dough on a tray, freeze until firm, then place in freezer bag. Store up to 3 months. Bake from frozen and add 1 to 2 minutes.
Variations and substitutions
- Chocolate chip jack-o’-lanterns: Press chocolate chips into the dough before baking to make faces. Push them in firmly, since they can pop up as the cookies bake.
- Mix-ins: Fold in up to 1 cup of chocolate chips, chopped pecans or walnuts, raisins, or dried cranberries.
- Glaze: Milk or half and half both work. Skip the glaze for a plain cookie, or dust with cinnamon sugar instead.
- Decorating: Use orange or white glaze with sprinkles, or the spider web design in the Chef’s Notes.

Helpful tools and equipment
- Parchment paper sheets are MUCH easier to use than tearing pieces off of a roll.
- Silpat silicone baking mat – These are an inexpensive option and they have great ratings.
- Cookie scoop – This is the exact cookie scoop I used to portion the dough.
- Baking sheet & cooling rack – I like this set that comes together. The cooling rack fits perfectly inside the pan.
- Scale – weighing ingredients is a much more accurate way to measure. This inexpensive scale is a great investment.

More Halloween Treats
- Halloween Rum Balls
- Pumpkin Cookies with Cinnamon Frosting
- Day of the Dead Chocolate Cupcakes
- Easy Pumpkin Empanadas – shortcut recipe
- Pumpkin Snack Cake
Please share
If you love this recipe, please give it 5 stars!
I hope you love this pumpkin sugar cookie recipe as much as we do! Please consider rating and/or commenting.
Your shares help this site to grow and I appreciate it so much. Do you know someone who would like this? I’d love it if you would share it on Facebook or pin it to your favorite recipe board.
Halloween pumpkin cookies
Equipment
Ingredients
For the cookies
- 2 ½ cups all-purpose flour 300g
- 1 ½ teaspoon pumpkin pie spice
- 1 teaspoon cinnamon
- ½ teaspoon salt I use Diamond Crystal kosher salt
- 1 teaspoon baking soda
- ½ teaspoon baking powder
- 12 tablespoons unsalted butter softened / 170g / 1 ½ sticks
- 1 cup granulated sugar 200g
- ½ cup light brown sugar 108 g
- 1 egg large
- 2 teaspoons vanilla extract
- ½ cup pure pumpkin purée 114g
For the glaze
- 2 ½ cups powdered sugar 312 g
- 3 – 4 tablespoons milk or half and half
- 2 teaspoons light corn syrup
- ½ teaspoon vanilla extract
- pinch salt
- decorations decorating gel, sprinkles, cinnamon sugar
Instructions
- In a medium mixing bowl, combine flour, pumpkin pie spice, cinnamon, salt, baking powder and baking soda. Whisk to thoroughly combine, then set aside.
- In a large mixing bowl, cream butter with sugars using an electric mixer until light and fluffy, about 3 minutes. Then add egg and beat to combine.
- Add vanilla and mix to combine, then add pumpkin and beat until smooth and uniform, about 1 minute.
- Add dry ingredients to the pumpkin mixture and beat until just combined. Scrape bottom and sides of bowl with a rubber spatula, then mix again just to combine.
- Line baking sheet with silicone mat or parchment paper. Using a cookie scoop, portion out dough onto prepared baking sheet. Refrigerate dough for 30 minutes.
- Preheat oven to 350°F / 325°F with convection / 180°C / Gas mark 4.
- Remove tray of cookie dough from refrigerator and place in preheated oven. Bake for 12 – 15 minutes (time varies by oven) until golden brown around the edges. *See notes
- Remove from the oven and let cookies cool on baking sheet for 5 minutes before removing to a cooling rack to cool completely.
Glaze and decorate
- In a medium mixing bowl, combine powdered (icing) sugar and milk. Stir to combine.
- Add remaining ingredients, then stir until smooth.
- Use an offset spatula to spread glaze on cookies. Decorate with sprinkles or decorating gel.
Video
Chef’s Notes
- To make spider web design: Use black decorating gel to draw a spiral pattern on top of glazed cookie. Drag a toothpick or wooden skewer from the center of the cookie through the spiral pattern to the edges of the cookie.
- Glaze drying time: Depending on the weather, the humidity, the temperature of your house, etc. — the drying time for the icing will be about 1.5 – 2 hours, if you choose to decorate the cookies. This is especially true if you use decorating gel, as it takes a little longer to set.
- A note on ovens: I recently got a new oven and the bake time varied by 4 minutes. So, know your oven. If it runs cool, or warm, gas, electric, etc.
- Don’t skip the chill: Chilling the dough serves a purpose — it helps to prevent your cookies from spreading so they bake up fluffy, it gives the flour time to fully hydrate, and it allows the flavors to develop.
- Use a cookie scoop for consistent results: Use a scoop for cookies that are the same size. Cookies (or anything) that are the same size will bake at the same rate giving you consistent results.
Nutrition
Nutrition Disclaimer
Nutritional information is an estimate provided to you as a courtesy. Use your preferred nutritional calculator using the products and brands you are using for exact information.
Buy me a coffee? If you ever wondered how you can lend a hand, show a little support or just say “thanks” for the recipes? You can “buy me a coffee” to help me keep the free recipes coming.
Thanks for stopping by! Have a delicious day 🙂

Questions? Send me an email, I’m happy to help. I’d love to send you weekly tips and recipes, so you can get updates about what’s happening in the kitchen!
Hello! All photos and content are copyright protected. Please do not use my photos or recipe (other than for personal use) without prior written permission. Thank you!
Originally published 9/21/22, most recent update 10/21/26.